With some images loaded, it’s about time we set about to do something useful with the environment, like fire up some instances. But before we do, those instances need to live somewhere. In this post I describe how to create an external provider network, a router and a private tenant network.
Creating Neutron Networks
Neutron networks can be external or internal/private and can be shared or kept within the bounds of a tenant (project). When a network is created with the external flag (a feature only available to ‘admin’ users), this network can be set as the gateway network of a router. This mechanism gives us the ability to hand-out Floating IP addresses from this external network so we can access our instances from outside of OpenStack.
Creating Neutron networks is done in two stages:
- Create the Network (this stage is like configuring a switch and cabling)
- Create the Subnet(s) on this network (assigning the CIDR, gateways, DHCP information and DNS)
This is the same process for any networks we create in OpenStack using Neutron.
1. Creating the External Provider Network (as ‘admin’ user)
In the lab environment, my external provider network is going to be my host network. In most environments, especially ones denoted by something real and not ones with the word ‘lab’ in the title, this provider network would be a routable network that is not your host network. The simple reason being security – putting instances on the same network as the hosts is considered a security issue.
With that aside, my configuration has allowed me to do this in my lab, and with a desire to access instances from my laptop on my host network – this is the desired state. To do this carry out the following:
- First create the network as follows. We’ll call this ‘flatNet’.
neutron net-create \
 --provider:physical_network=flat \
 --provider:network_type=flat \
 --router:external=true \
 --shared
 flatNet
This should produce output like the following:

- Next we allocate a subnet to this network as follows:
neutron subnet-create \
 --name flatSubnet \
 --allocation-pool start=192.168.1.150,end=192.168.1.170 \
 --dns-nameserver 192.168.1.1 \
 --gateway 192.168.1.254 \
 flatNet 192.168.1.0/24
This produces output like the following:
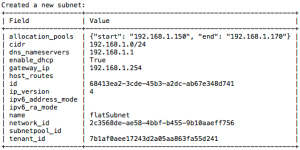

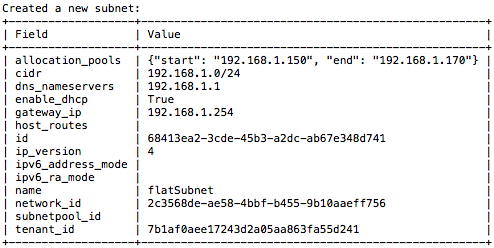
This is all we need at this stage. We’ve created a network, and marked it as available as an ‘external’ provider network. We marked it as shared so that any tenants (projects) we create in our environment can all use this external network. We then put on a subnet which is part of my 192.168.1.0/24 CIDR, but restricted what IP address we could get with the start and end range (so as not to conflict with the other clients on the same network – would be terribad one of my instances claiming the IP of a device running Netflix in this household!).
2. Create a router
The external network allows me to create instances on that network. This gives me limited functionality in my environment – given the fact that what I created was a single, flat network. To allow me to produce multi-tier environments, and allow me to access resources outside of my OpenStack environment, we need to introduce a router. This router will allow me to create private tenant networks, and create instances on them, and have routed access to the internet and other networks I create. It also enables the functionality of providing Floating IP addresses to my instances – so I can selectively assign IPs to instances that I want to be ‘externally’ accessible (in this case, instances that are accessible from my host (home) network).
To create a router, it is as simple as the following
neutron router-create myRouter
This isn’t an ‘admin’ function – any user in a tenant can create routers. As I was using my ‘admin’ user’s credentials, this created this in the ‘admin’ tenant. If I was in another tenant, called development, I’d have to create a router in that too for example. (An admin user, however, can create routers in other tenants, by specifying the –tenant flag when creating the router).
3. Assign the gateway of the router to the external provider network
A router is not much use if it can’t route somewhere. The intention of this router is to provide access inbound and outbound for my instances, and to do this I must set a gateway. The choice of networks that allow me to assign it as a gateway was provided when I specified the –router:external=true flag when I created the network (in Step 1. Creating the External Provider Network).
To set a gateway on the router, carry out the following
neutron router-gateway-set myRouter flatNet
(If you have multiple networks of the same name, or even routers of the same name, use the UUID of the resources instead.)
4. Create a private tenant network
At this stage, we have an external provider network, and a router. We can now create a private network for our instances to live on. In the OSAD installation, tenant networks will be created as VXLAN networks and creating them follows the same pattern as before: create the network, then create the subnet on that network.
To create a private tenant network, with a CIDR of 10.0.1.0/24 carry out the following:
- First create the network (note the lack of options required to make this simple network)
neutron net-create privateNet
This creates output like the following:

- Secondly create the subnet details
neutron subnet-create \
 --name privateSubnet \
 --dns-nameserver 192.168.1.1 \
 privateNet 10.0.1.0/24
This creates output like the following:
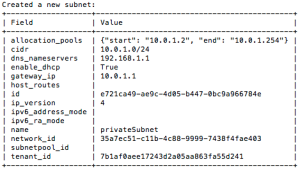


And that’s it. We carried out the same steps as before – we created a privateNet network, and then we created a subnet on this. I’ve kept the defaults for the gateway and DHCP range. This means that all the IP addresses in the CIDR are available apart from 2: The gateway IP (will be .1 of the range) and the DHCP server address.
5. Connect the private tenant network to the router
Finally, we connect the private tenant network to the router. This allows us to be able to connect our instances to the outside world via the router, as well as be able to assign Floating IP addresses to our instances. To do this, carry out the following:
neutron router-interface-add myRouter privateSubnet
(as before, if you have subnets or routers with the same names, use the UUIDs instead).
With this done, we end up with the following:

We can now spin up instances on these networks.

Hi,
i have deployed OpenStack. my controller and compute node is in 192.168.1.128/26 network. i have created provider network using below command. but i am not able to ping floating IPs from controller or compute.
Command :- neutron subnet-create –name flatSubnet –allocation-pool start=192.168.1.178,end=192.168.1.182 –dns-nameserver 8.8.8.8 –gateway 192.168.1.77 flatNet 192.168.1.176/29.
i have only 15 IPs available in network.
Please help i am not sure about subnet 192.168.1.176/29 and gateway 192.168.1.77.
should i have to use subnet 192.168.1.128/26?
Please help …